EDATEC VESA Wall Mount Bracket
EDATEC VESA Wall Mount Bracket
SKU:123004111
Out of stock — Available on backorder
Couldn't load pickup availability
Other VESA brackets: Adjustable wall mount or Desk mount.
This listing is for the ED-VESA-A: VESA wall-mount bracket for EDATEC ED-MONITOR displays. Contact us if you have questions about compatibility with your display.
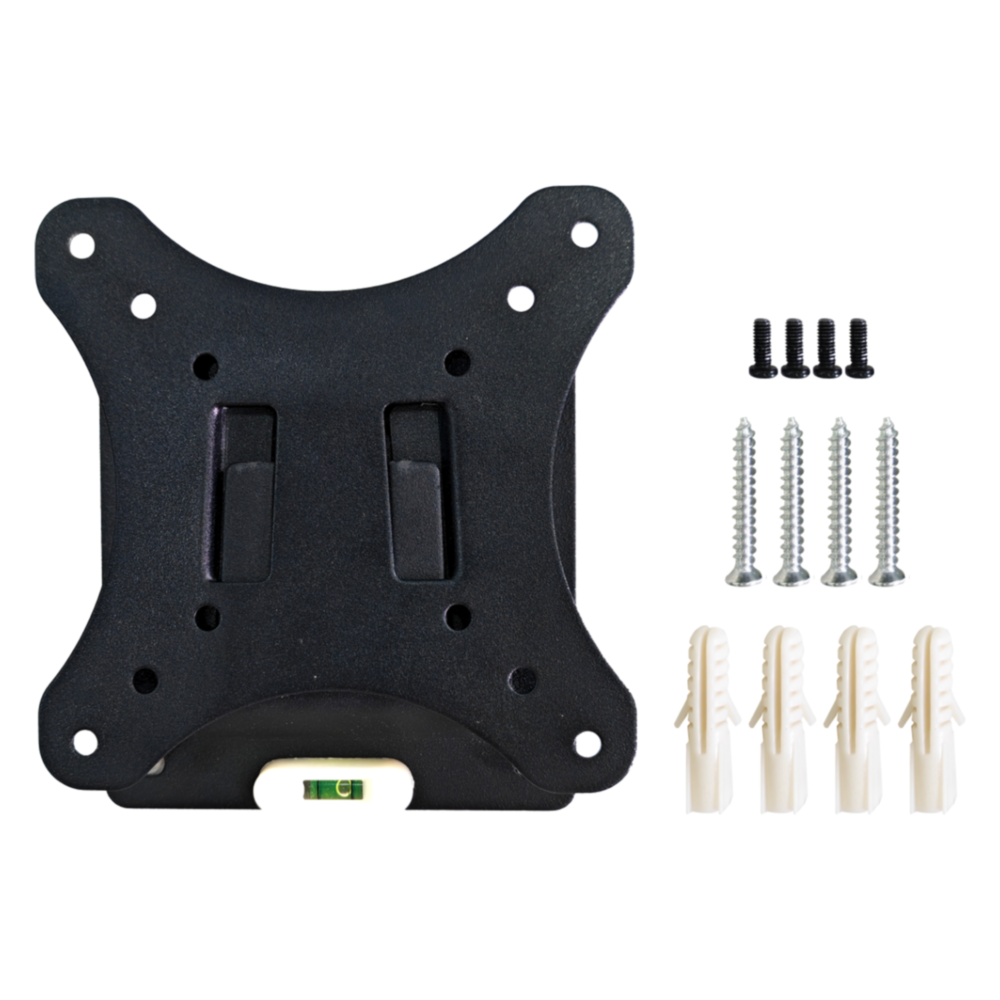
The ED-VESA-A is a durable and compact VESA wall-mount bracket designed for securely mounting EDATEC ED-MONITOR displays in industrial, commercial, and embedded environments. Built from sheet metal with a snap-on installation design, it provides easy setup while maintaining stability. Supports 50mm, 75mm, and 100mm VESA hole patterns with 15mm wall clearance and a maximum load capacity of 20kg.
Key Features
- Designed for: EDATEC ED-MONITOR displays
- VESA Hole Patterns: 50×50, 75×75, 100×100mm
- Installation: Wall-mounted, snap-on design for quick setup
- Wall Clearance: 15mm
- Max Load Capacity: 20kg
- Construction: Sheet metal, black finish
- Applications: Industrial displays, control rooms, kiosks, retail, office monitor mounting
Specifications
| Category | Details |
|---|---|
| Material | Sheet metal |
| Colour | Black |
| Weight | ~265g |
| Max Load Capacity | 20kg |
| VESA Hole Pattern | 50×50mm / 75×75mm / 100×100mm |
| Wall Clearance | 15mm |
| Fixing Method | Snap-on design |
| Installation | Wall-mounted |
| Wall Screws | 4x M5×30 screws + 4x M5×40 plastic expansion tubes (included) |
| Monitor Screws | 4x M4×5 screws (included) |
Installation Notes
Tools required: electric drill, pencil, hammer, screwdriver.
- Separate the bracket's Base Plate and Panel before starting.
- Align the Base Plate with the wall and use a pencil to mark the 4 screw hole positions.
- Drill 4 holes at the marked positions, then use a hammer to insert the 4 M5×40 plastic expansion tubes.
- Align the Base Plate screw holes with the expansion tubes, insert 4 M5×30 screws, and tighten clockwise to fix the Base Plate to the wall.
- Align the 4 screw holes on the bracket Panel with the VESA mounting holes on the back of the ED-MONITOR, insert 4 M4×5 screws, and tighten clockwise.
- Lift the ED-MONITOR (with Panel attached), align the snap-on slots on the Panel with the Base Plate, and press firmly to lock.
Tip: The VESA hole spacing for the ED-MONITOR is 75mm. ED-MONITOR is not included.
What's in the Box
- 1x ED-VESA-A unit (Base Plate + Panel)
- 4x M5×30 screws (for wall mounting)
- 4x M5×40 plastic expansion tubes
- 4x M4×5 screws (for attaching Panel to monitor)
Technical Documents
MCCI and MCCI Catena are registered trademarks of MCCI Corporation. All other trademarks are the property of their respective owners.